This tutorial explains the steps that an agency administrator would go through in order to validate a timesheet after it has been approved by a client authoriser and submitted using the fax-back, email or image upload methods. For information on validating images submitted by Etz Sign or Online Approval methods, see Online Validation of Timesheets.
Timesheet validation is used within the system as a secondary check for accuracy of information. If any details are incorrect at this stage, it is possible to amend them in order to quickly rectify the problem, without having to restart the process. However, if the data should be resubmitted by the candidate, then it is also possible to reject the timesheet at this stage.
In order to view all timesheet images currently awaiting validation, navigate to the 'Timesheet' menu and then to ‘Incoming Timesheet Images’.
It is possible to view each image by hovering the mouse over the document symbol on the left hand side.
If the image has been uploaded by the Etz portal or has been automatically recognised by the barcode, then it will already be assigned to a specific timesheet on the system. In this case, the 'Candidate', 'Client' and 'Period End' fields will be filled in for the image line in the list view. If not, then the image will need to be manually assigned. For information on how to do this, please see the 'Manual assignment of timesheet images' section towards the end of this tutorial.
When you click on the number within the 'Image' field of an assigned image, two windows should appear - one containing the timesheet image and one showing the system timesheet details (as seen in the image below).
It is from here that the timesheet can be accepted or rejected using the 'Validate' and 'Reject' buttons. Any details that are incorrect can be amended - if the changes affect the values on the sheet, make sure to first click 'Recalculate' prior to clicking on 'Validate' in order to view the new totals.
If the system detects any potential errors at this stage, the validation process will fail and an error or warning message will appear at the top of the screen, as in the image below.
The message will inform you of the problem so that you can resolve any conflicts and revalidate. Alternatively, you can use the ‘Override’ button to bypass any warnings and continue to validate.
If you decide to reject the timesheet, you will need to provide a reason in the‘Reject Note’ field - failing to do this will result in a red error box appearing at the top of the validation screen.
Once rejected, the timesheet (along with the rejection note) will go back to the candidate to be amended, before being sent through the approval process again.
Once the timesheet, or timesheets, have been validated, they are then ready for the invoice process. For further information on this, please see the tutorial How to create a sales invoice.
Manual assignment of timesheet images
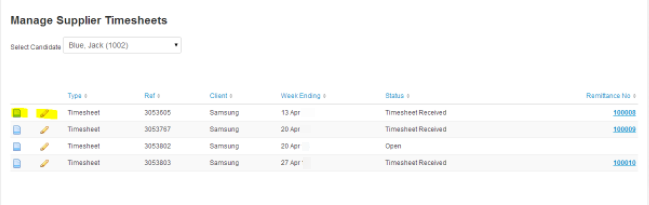
To manually assign a digital image to a timesheet, first click on the image number within the field 'Image'. This should bring up the image in a new window. Make a note of the candidate, client and period end date. Leaving that window open, return to the list view and scroll down to the section 'List of timesheets by candidate', where all timesheets that are on the system and awaiting an image are listed.
Locate the timesheet that corresponds to the opened image, using the filters if necessary, and click on the pencil icon on the matching timesheet line. This will bring up a second window, where the timesheet details can be viewed and, if necessary, amended, before validating or rejecting the timesheet in the same way as described earlier in this tutorial. The image that was opened at the start of this manual procedure will be automatically attached to the system timesheet. If no image window is opened first, you will be unable to validate the timesheet - the button will be greyed out.